
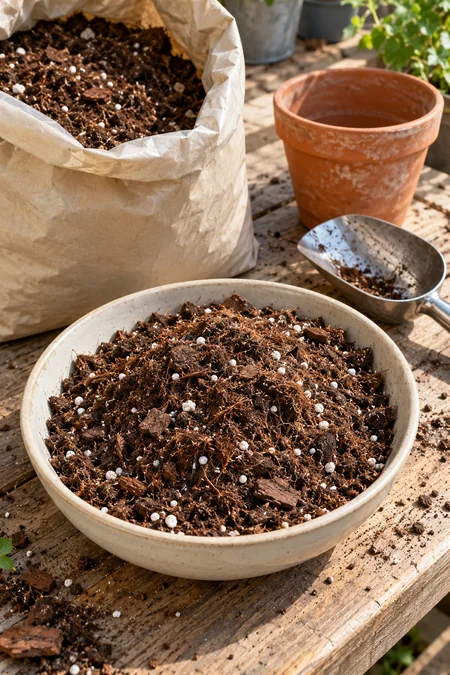
A bag marked “soil” can look like the right choice until your pot stays wet for days or water runs straight down the sides. The best soil for container gardening is a mix that suits your plants and works inside a pot. For many vegetables, herbs, and flowers, that means a bagged potting mix made for containers.
Roots need both water and air. A useful mix holds moisture but also has small spaces where air can reach the roots. Soil dug from a garden can become too dense in a container, even when plants grow well in that same soil outdoors.
This guide will help you pick a mix, spot products better suited to garden beds, and fill a pot without packing it tight. You will also learn why a gravel layer cannot replace drainage holes.
Allow about 15–20 minutes for one container once your supplies are ready. You do not need a homemade recipe or a shelf full of additives. Start with your plant’s needs, a suitable bag of mix, and a pot that lets extra water escape.
Your potting plan
15–20 minutes
15–20 minutes
Beginner
Estimate for preparing one container with supplies ready; shopping and planting are not included.
What you need
- A plant or its care tag to guide your mix choice
- Potting mix suited to that plant and labeled for container use
- A container with open drainage holes
- A clean tub or bucket with room to stir the mix
- A scoop, hand trowel, or sturdy plastic cup
- Water and a watering can or jug
- An optional saucer to protect the surface beneath the pot
Check the container’s stated soil capacity when buying mix. The plant’s root ball will take up some of that space.
Choose the Best Soil for Container Gardening for Your Plants
Most common container vegetables, annual flowers, basil, and parsley can start in a general-purpose container potting mix. The goal is to hold some moisture while leaving air around the roots.
For cacti and many succulents, choose a mix made for those plants that drains freely and dries faster. Plants with special needs, such as blueberries or orchids, need a more specific choice. Use the plant’s care tag to guide you; one bag will not suit every plant.
Match the mix to the plant
Start with a general-purpose mix labeled for containers.
Look for a mix made for their lower moisture needs.
Follow plant-specific guidance for acidity, texture, and moisture.

Read the Bag Before You Buy
Product names can be confusing. For potting soil vs garden soil, check the intended use rather than the name alone. Look for wording that says the mix is suitable for containers.
Ingredients may include peat or coir for moisture, with bark, perlite, or pumice to help keep the mix open. Recipes vary. Check for added fertilizer too, so you can follow the feeding directions without doubling up at planting.
Read past the product name
Look for
- Directions for use in containers
- A mix suited to your plant
- Ingredients that balance moisture and air
- Clear fertilizer and feeding information
Avoid as the sole fill
- Soil dug from the yard
- Bagged garden soil intended for beds
- Topsoil
- Straight compost
Compost can be an ingredient in a balanced potting mix. A container filled with compost alone may settle and hold too much moisture.
Pick a Container with Open Drainage Holes
Even a suitable mix cannot fix a sealed pot. Check that water has an open path through the base before you fill it. A decorative pot without holes can hold a separate draining nursery pot, but remove the nursery pot for watering.
Empty collected runoff from saucers or outer pots. Roots should not sit in leftover water.
Give extra water a way out
- Open base: Check that the drainage holes are clear.
- Clear exit: Avoid placing the pot where its holes are sealed against the surface.
- Empty catch tray: Remove runoff from the saucer after watering.
- Removable inner pot: Let a nursery pot drain before returning it to a decorative outer pot.

Moisten Dry Potting Mix Before Filling
If the mix feels dry and dusty, tip what you need into a clean tub. Add water in small splashes, turning the mix with a scoop so dry pockets get damp too. Stop when it feels evenly moist and crumbly, with no pooled water. This helps dry peat-based mixes take up water more evenly. Already-damp mix needs no extra water; follow any different preparation directions on specialist mixes.
Aim for damp, loose mix
Too dry
Dusty fibers and dry pockets remain. Add a little water and turn the mix again.
Evenly damp
Moist throughout but still loose and crumbly. No water collects at the bottom of the tub.
Too wet
The mix looks slushy or sits in a puddle. Stop adding water and blend in more of the same dry mix.
There is no fixed water amount for every bag. Mix ingredients and starting moisture vary; judge the feel rather than the color alone.

Fill the Container Without Packing the Mix Down
For a typical 10–12-inch-wide pot, plan to leave about 1–2 inches between the finished mix surface and the rim for watering. Spoon loose mix into the base, keeping enough space above it for the root ball.
You can rest the plant, still in its nursery pot, on that base layer to check the height. Adjust the mix so the root ball’s top will sit at the planned soil level, then lift the nursery pot out. Avoid pressing the mix into a hard layer. The container is ready for planting and filling around the roots.
Plan the space inside your pot
Allow about 1–2 inches in a typical 10–12-inch-wide pot. Leave less in very small pots.
Keep this area open while preparing the container. For most transplants, the root ball’s top should sit level with the surrounding mix when planted.
Adjust its depth to support the root ball at the right height. No hard-packed layer or gravel underneath.
This is a planning guide, not a scale drawing. Follow any different planting-depth guidance for your chosen plant.

Troubleshoot Common Container Soil Problems
After planting, watch how water moves through the pot and how the mix settles. Good drainage in containers depends on the mix, open drainage holes, and somewhere for runoff to go. A dry-looking surface alone does not tell you how wet the roots are.
Check the symptom before changing the mix
| If this happens | Try this |
|---|---|
| Water runs down the sides, but the mix stays dry | Very dry mix can shrink from the pot and resist wetting. Apply water slowly across the surface in several passes, allowing each pass to soak in. Check below the surface near the root ball; runoff alone does not prove that the mix is wet. |
| Water drains slowly or the mix stays soggy | Check for blocked holes and trapped water in the saucer or outer pot. Do not water again while the mix is still too wet for your plant. If the pot contains dense garden soil or a collapsed mix, repot with a suitable container mix rather than adding gravel. |
| The mix settles far below its starting level | A little settling after watering is normal. Fill small gaps around the root ball with the same mix, keeping the original planting depth. If the whole plant has sunk, reset it at the correct height; piling mix over the stem or crown can cause problems. |
Check moisture before watering again. Plant type, pot size, weather, and light all affect how quickly a container dries.
Common Questions About Container Potting Mix
Before you fill your next pot
Can I use garden soil in a container?
For most everyday pots, choose a mix made for containers. Garden soil can become dense in a pot and leave too little air around the roots, even when it works well in a garden bed.
Should I add compost to bagged potting mix?
A ready-to-use container mix may already contain compost and does not automatically need more. Extra compost changes how the mix holds water and nutrients, so follow the product directions or a recipe suited to your plant rather than adding it by guesswork.
Does potting mix contain enough fertilizer?
Some mixes include fertilizer, while others contain little or none. Read the bag for what was added and when feeding should begin, then follow directions for your plant and fertilizer. Avoid adding a second full dose at planting when the mix already supplies it.
Can I reuse potting mix from last season?
Often, if the previous plants were healthy and the mix still drains well. Remove old roots and debris, blend in fresh mix if needed to restore a loose texture, and plan fertilizer for the new plants. Replace mix that has become dense or came from plants with a known root disease or serious pest problem.
Do I need to add perlite to every potting mix?
No. Many bagged mixes already contain perlite, bark, pumice, or other ingredients that help keep air spaces open. Add more only when a plant-specific recipe or the product directions call for it; too much can make the mix dry faster than your plant needs.
Keep This Container Soil Quick Reference Handy
Your container soil quick reference
Beginner task · About 15–20 minutes to prepare one pot with supplies ready
What you need
Your plant or care tag, a suitable container potting mix, a pot with drainage holes, a mixing tub, a scoop, and water in a jug or watering can. Add a saucer if needed to protect the surface below.
Five steps to a pot ready for planting
- Choose: Match the potting mix to your plant’s growing needs.
- Read: Check the bag for container use, ingredients, and added fertilizer.
- Pick: Use a pot with clear drainage holes and an open path for runoff.
- Moisten: Dampen dry mix gradually until loose and evenly moist, following any specialist directions.
- Fill: Add a loose base layer, leaving room for the root ball and watering space below the rim.
For a typical 10–12-inch-wide pot, leave about 1–2 inches below the rim once planted. Keep the plant at its recommended depth and empty collected runoff.
You have chosen a suitable mix and prepared a container with space for the roots.
The best soil for container gardening suits your plant’s moisture needs while leaving air around its roots.
Your next step is to plant at the recommended depth and follow that plant’s watering guidance.
Save this guide to your Pinterest gardening board so the checklist is nearby when you fill your next pot.